Sato CLN4X - Loading Media and Calibrate
- Trebnick Systems
- May 2, 2023
- 6 min read
Updated: Jun 10, 2024
This tutorial is for the Sato CLN4X. Other Sato printers have similar menu setups, so this tutorial may work for other models. Check your printer before changing your settings. The Sato CLN4X thermal printer with cutter attachment is shown.
Step 1 - Loading the Ribbon
Unless you are working with direct thermal material, you will not only need to load your media, but you will also need to load your ribbon as well! Open the printhead using the blue latch on the right and feed your ribbon under the printhead. Be sure your excess ribbon is securely attached to the uptake spindle that is located directly above the printhead. The ribbon will pull your tags through the printer, so if it becomes detached anytime while you're printing, your printer will stop printing and display an error.
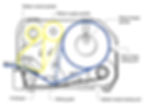
You can check the yellow path guide in the below graphic on how to load your ribbons properly. In the video above, we used a CSI (coated side in) ribbon, so we followed the solid yellow path. If you are using a CSO (coated side out) ribbon, you will want to follow the dotted yellow path. If you aren't sure what kind of ribbon you have, you can use scotch tape to check. The inked side will stick to the tape and easily come off the ribbon!
Step 2 - Feed Your Media
If you are working with a roll of tags, slide the roll onto the spindle at the back of the printer. Secure the roll with the metal guide attached to the supply spindle, as this will keep the roll from shifting while you print! If you're using fan-folded tags, they'll have to get fed into the printer through the bottom or rear media loading slot indicated in the above graphic.
The labels we used in the video are facing out on the roll, so we are following the dotted blue path guide. If you want to print on the inside of the roll, you can turn the roll around on the media spindle and follow the solid blue path. You will notice in the video that we remove a label from the roll before feeding it through the printer. Exposing the liner like this will help us calibrate the printer later. If you are printing on tags, you can skip this step.
Once your media is loaded, feed it under the media guide, sensor plate, and printhead. If your printer has a cutter attachment like ours, open the cutter attachment using the small blue latch to the right of the cutter. Feed your media past the cutter, then close it. Secure the media in place with the paper guide on the media guild, as this will keep your paper from shifting while you print!
Step 3 - Aligning the sensor
To properly calibrate your printer and avoid several errors, ensure the sensor plate is in the correct position! The sensors are under the blue plate. The blue plate slides to the left and right across the printer; your media should pass under this plate. A bar and a triangle icon are in the bottom left corner of the blue plate. These symbols indicate the position of each sensor.
If you are using media with a black mark, then position the bar icon on the far left so it will pass over the black mark as the media feeds through the printer. Notched tags also use the bar icon, so you want the bar to pass over the notch. If your tag has a hole, avoid placing the sensor over it. Otherwise, your printer might place the print incorrectly due to a miss-calibration. You will want to place the sensor in a space where it can calibrate to a blank section of your tag.
SPECIAL NOTE FOR BLACK MARK MEDIA:
Some black marks go across the entire media width, while others only go partially across. So it's important to place the sensor over the black mark. The sensor reads from the bottom, so make sure your black mark is FACE DOWN as it goes through the printer.
If you are using labels with a gap like we are in the video, then position the sensor where it will pass over the gap between each label. To ensure proper calibration, the sensor plate should be over the area where we removed the label to expose the liner. This blank space will let the printer know what to look for in the calibration process. Once you position your sensor correctly, close the printhead and printer cover. You are now ready to calibrate!
Step 4 - Calibrate your printer

How you calibrate your printer will depend on the type of media you are using. Are you printing on tags or labels? What kind of sensor is there, is there one at all? Not having the printer set to the correct settings will result in printer errors. One of the most common for Sato printers is the "1008 Out of Paper" error. To fix this, we must go through a few printer settings to tell the printer what kind of media we are printing on!
While the printer is offline, hit the "enter" button on the far right to get to the settings menu. Navigate to...
Printing > Sensor Type
From here you can use the arrow keys to select what kind of media you have...
None - continuous tag or label material that has no sensor features
Gap - labels with gaps between each label
I-Mark - sometimes referred to as "black mark," use this for tags or labels with a black bar that goes either partially or fully across the paper. Use this setting for notched tags as well.

To save your selection, hit the check mark at the right. This will take you back to the Printing menu. There is one more setting we need to check before we can calibrate the printer. Keep navigating down to the very bottom of the Printing menu:
Advanced > Paper End
Using I-Mark - Use this one if you selected 'I-Mark' in the Sensor Type setting. This setting will also be to used for continuous media, as it will sense when the end of the roll passes through the printer.
Using Gap - Use this one if you selected 'Gap' in the Sensor Type setting
Now that we have the correct settings, we can calibrate the printer! After selecting the Paper End setting, we should have returned to the "Advanced" menu. Navigate back up to the top of the menu:
Calibration > Auto-calibration
Gap + I-Mark - adjusts both sensors. (We don't use this setting as often, as we prefer to better define what sensor feature we are using)
Gap - adjusts the gap (triangle) sensor. Use this one if you selected the 'Gap' settings as your Sensor Type.
I-Mark - adjusts the I-Mark (bar) sensor. Use this one if you selected the 'I-Mark' or 'None' settings as your Sensor Type.
Once you have selected one, hit the "Start" button to begin the calibration process. A pop-up will appear, informing you to position the media under the sensor plate. We covered this when loading the media, so you can select the check mark to continue calibrating. When the printer says "Calibration completed successfully." you have completed the calibration process, select the check mark, and you can use the circle "back" button to go back to the home screen.
You should now be ready to print! You can test to make sure your printer is calibrated correctly by hitting the "Feed" button on the printer while it is still "Offline." If it feeds one tag or label, you're good. Go "Online" and print!
If the "Feed" results in an error message, adjust your sensor and try calibrating again. Once the printer gives the "Calibration completed successfully." message, put the printer back "Online," and you are ready to print!
Troubleshooting
If your printer is still giving media errors when you go to print, despite having already inputted the proper settings into the printer, check the print settings on your computer. Many times the print settings on your computer will override the settings on the printer. Double-check that the print dialog box settings when you go to print match that of your printer before sending the job to the printer!
Still Having issues? give us a call! We won't leave you stranded!

215 S. Pioneer Blvd.
Springboro, OH 45066
www.trebnick.com
orders@trebnick.com
937-743-1550